Translate

Thursday, 6 December 2012

Orange Poppy Seed Cake - A New Recipe with Naranjas Orbe

 
Given how great our Orangettes turned out, at Braulia's Kitchen we decided to keep on trying new dessert recipes with the juicy and delicious Orbe Oranges! So we came up with a cake we wanted to make for a while now, a Poppy Seed Orange bundt cake!

Teniendo en cuenta lo geniales que nos quedaron las Orangettes, en Braulia's Kitchen decidimos seguir probando nuevas recetas con las deliciosas y jugosas Naranjas Orbe! Así que hicimos una tarta que llevabamos tiempo queriendo probar, una pastel de Naranja y Semillas de Amapola!

The result was a fantastic; light and buttery with a fresh orange taste and a slight crunch of the poppy seeds!

El resultado fue fantástico; ligero y mantequilloso con un fresco sabor a naranja y el toque crujiente de las semillas de amapola!


For the final touch we glazed it with royal icing, grated some orange zest and sprinkled some seeds over it.

Para el toque final lo cubrimos con glaseado fondant, rallamos cáscara de naranja  y añadimos unas pocas semillas.


Try this recipe, it's fabulous!

Probad esta receta, es fabulosa!


Tuesday, 4 December 2012

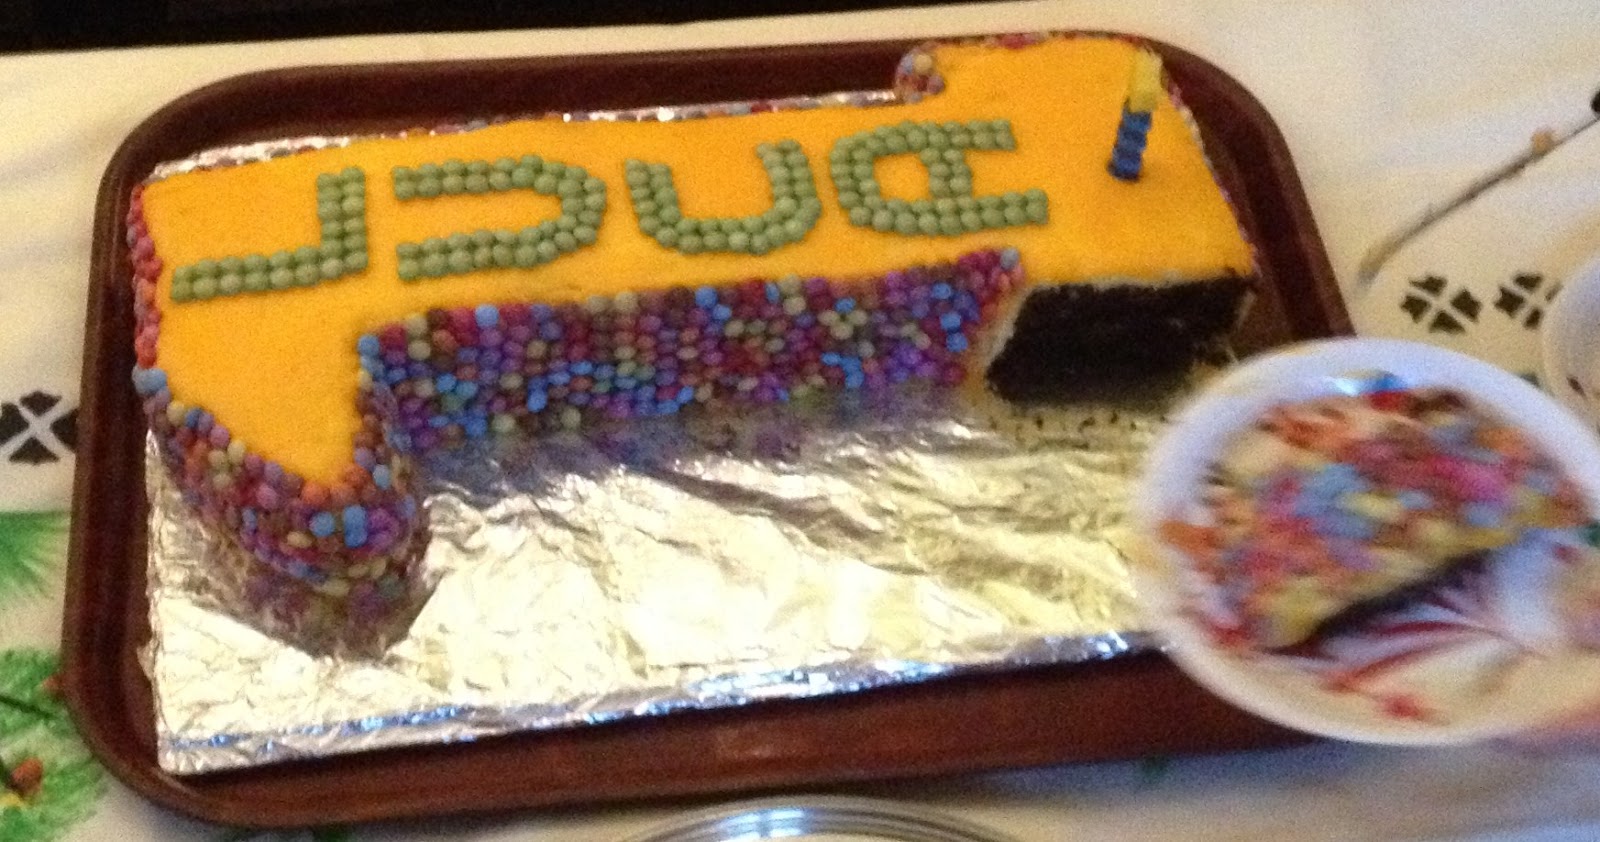
Birthday Cake For a One Year-Old - My First Order!


Last weekend I had my first official order for the birthday party of a one year old.
The mother of the birthday boy asked for a traditional chocolate cake topped with a fluffy buttercream.
So now the only thing left was to decide on the shape and theme of the cake.
As it was his first birthday party I decided to stick with something simple but yet colourful and original, a 1 shaped cake with yellow frosting and covered with Smarties.
Where did my inspiration come from? My mother and the cake she made for my 2nd birthday party!

El pasado fín de semana tuve mi primer encargo oficial para la fiesta de cumpleaños de un niño de un año de edad.
Para la tarta, la madre del homenajeado, me pidió un bizcocho de chocolate cubierto por un cremoso buttercream.
Ya solamente quedaba decidir la forma y temática del pastel. Al ser un primer cumpleaños opté por algo simple, original y colorido, una tarta con forma de 1 con un buttercream amarillo y todo ello recubierto de Smarties.
¿De dónde me llegó la inspiración? De la tarta que me hizo mi madre para mi segundo cumpleaños!

One-year-olds may be too young to eat the Smarties but they sure do enjoy the colours of them, and in this case Luca (the birthday boy) loved it!
Pese a que niños de tan solo 1 año de edad sean muy pequeños para poder comer los Smarties, les encantan sus colores, y en este caso a Luca (el cumpleañero) le entusiasmó!

Once the design, cake, frosting and decoration was decided all I needed was to get started with it!
Una vez ya estaba decidido el diseño, bizcocho, cobertura y decoración de la tarta, ya solo quedaba empezarla!

For the cake I used the best never-fail chocolate cake recipe, from none other than the Queen of Baking: Martha Stewart!

Para el bizcocho utilicé la mejor receta, que nunca falla, de tarta de chocolate de la reina de la reposteria Martha Stewart!


For the frosting I decided to make tangy lemon buttercream icing for which I used about 500 grms of softened butter (yes it's a lot, but it was a really big cake!), 2 1/2 cups cofectioners sugar, 2 tablespoons milk, lemon juice and zest; and for that bright yellow colour I used Wilton's Golden Yellow Icing Colour.

Para la cobertura deicidí hacer un buttercream de limón, para el que utilicé unos 500 grms de mantequilla blanda (sí es mucha, pero la tarta era grandísima!), 2 1/2 tazas de aúcar glaçé, 2 cucharadas soperas de leche, zumo y ralladura de limón; y para conseguír ese brillante color amarillo use el colorante Golden Yellow de Wilton.

Once the cake was formed to figure a 1 and covered with the frosting I starting sticking the mini Smarties.
For the name I decided to use  the green coloured sweets as they stand out, and cover all of the sides with the remaining candy.

Una vez la tarta ya estaba cortada en forma de 1 y cubierta con el buttercream empecé a pegar los mini Smarties. Para destacar el nombre utilicé los de color verde, y cubrí todo los laterales con los caramelos sobrantes.

Et voilá, 45 very long minutes later the cake was ready!

Et voilá, tras 45 largos minutos la tarta ya estaba lista!


If you are interested in making an order please send a mail with your enquiry to brauliaskitchen@gmail.com!
From cakes to pies, cupcakes, pavlovas, cookies, brownies, petit fours, you name it we make it!

Para realizar un pedido envía tu solicitud a brauliaskitchen@gmail.com!
Desde tartas a pies, cupcakes, paulovas, todo tipo de galletas y cookies, brownies, petit fours, lo que quieras, te lo preparamos!

Monday, 3 December 2012

Lemon Meringue Pie - a Traditional Favourite


Who doesn't love pie? 

Everyone has their favourite; apple, pecan, cherry, chocolate, blueberry, key lime...But if there is one that is the most famous and loved by everyone that should be the Lemon Meringue.


A simple treat made with a crust (shortbread or shortcrust), covered with a tangy lemon curd and topped by a fluffy meringue, or an italian meringue as we do at home! 
Once the meringue is piled over the pie it's baked in the oven until golden brown. However at home we prefer a flambe torch and grate some zest over it.


This classic never gets old and it's great for dessert, tea, or why not, breakfast! There should never be an excuse to eat this delicious pie!

The recipe? Well it's easy peasy, try this one!

Enjoy!


Saturday, 1 December 2012

Chocolate Orangettes

A few days ago while having lunch at my sister's house, my brother in law came up with the idea of making orangettes.
It's basically candied oranges covered with a nice good quality dark chocolate; sounds simple, and inexpensive but for some reason they are sold at really high prices at every other bakery.
This led to a debate about how 3 simple and cheap ingredients, that everyone has at home, can end up being sold at prices that can sometimes be outrageous.
So finally I decided to give it a try myself and see if it was worth making them at home rather than buying them.

The procedure goes as follows:

First of all you must cut the orange peel in slices (the width should be almost 1cm).
Blanch them in water at least 4 times to get rid of any bitterness. To do this put the orange rinds in water and once it starts boiling strain them and restart the same process.

 Remember it has to boil 4 times!

So once you've blanched them, it's time to candy the rinds.

For 5 large oranges I used 1/2 liter of water and 250 grms of sugar. I poured both ingredients into a saucepan and once the sugar had dissolved and started to boil I incorporated the orange peel. This step can take a while, 45 minutes or so at medium to low heat and stirring once in a while. The peel strips will be ready once they become translucent.
What's the next step? Leave them to dry over a cool rack for 4 - 5 hours (I left mine for almost 24 hours!). Check out how translucent they are, that's what they should look like!
Keep the leftover syrup , it can be useful in sooooo many ways, for fruity cocktails, to soak over a cake, anything!

Once the strips are dry, the last step will be dipping them in tempered dark chocolate (I used 70% dark chocolate).
Chop the chcolate (200 grms) pour 2/3 over a heat proof bowl and melt it, the temperature must rise to 50ºC, remove from the heat and add the remaining 1/3 chopped chocolate.  Let it cool to 26/27ºC and once again put it over the heat until it's at 32ºC, now it's at a perfect temperature to coat without being too runny.
Dip the strips with the help of two forks and place over a cookie sheet to cool.
Leave for 1 or 2 hours (max) to dry. 

Et voilà! 

In conclusion, these treats are a little time consuming and messy, but not at all difficult and what's most important, they taste delicious! So from now on, no more store bought, just homemade orangettes!

And last but not least I want to give special thanks to Naranjas Orbe for having such great oranges, I will definitely be using them for more recipes!

Saturday, 17 November 2012

Effortless Chocolate Walnut Biscotti

Having friends over for tea or coffee, and you don't have a clue of what to serve?

I'll tell you, Biscotti!


These traditional italian cookies are easy, tasty, and most important CHEAP!! And what's more, you can add to the dough whatever you want, dried apricots, pistachios, hazelnuts, cranberries, white chocolate chips...ANYTHING!


They are absolutely perfect to have with anything, with a warm drink in these cold autumn days, or a delicious ice-cream in a hot summer day.


Remember if you want to give a great impression in a dinner or at home, without having to spend hours and hours in the kitchen baking, these are great!!


Ingredients:
85 grs softened butter
2 cups all purpose flour
1/2 cups cocoa powder
1 teaspoon baking soda
1/4 teaspoon salt
1 cup sugar
2 large eggs
1 cup walnuts (or any other ingredient you want)

  1. Preheat the oven at 180ºC.
  2. In a medium bowl whisk flour, cocoa, baking soda and salt. In a bowl of an electric mixer cream the butter and sugar until it's light and fluffy. Add the eggs one at a time and beat until it's well combined. Add the flour mixture and stir to form a stiff dough. Finally add the nuts.
  3. Transfer the dough to a baking sheet (with butter and flour if necessary) and form into a log flattened (careful this can be a little messy!). Bake for 25-28 minutes.
  4. Let it cool for 5-10 minutes and cut into pieces. Once done, re-bake for 8 minutes (that's why they are called biscotti, because it's twice baked!).
Et voilà! Enjoy!

Thursday, 15 November 2012

Cream Cheese Brownies


Yes, I declare myself a huge fan of brownies! But not any type, only those that are super moist, fudgy, sweet, and will make you more and more addicted as you take a bite after another.

For a while now, I wanted to try and bake my own cream cheese brownies, just to give it a try and see if it  really was worth becoming addicted to them too. And thank god I decided to go for it! These brownies totally ROCK!

Searching for the perfect recipe I came across these by Martha Stewart.
I modified it just a little bit, and they turned out fantastic! They really were a huge hit in a dinner with friends.

So once again, thank you Martha for coming up with such a great brownie recipe!


Recipe (adapted from Martha Stewart)

Ingredients:
140 grs butter (113 grs for the brownie and 28 grs for the cream cheese mix)
1 cup plus 2 tablespoons flour
1/4 cup baking cocoa
1/2 teaspoon baking powder
1/2 teaspoon salt
1 1/2 cups caster sugar 
226 grs baking chocolate
113 grs cream cheese
3 eggs plus 1 egg yolk
2 teaspoons vanilla extract (one for the brownie batter and the other for the cream cheese mix)

1 - Preheat the oven at 180ºC. In a bowl whisk flour (just the 1 cup), baking soda, salt and cocoa. Set aside.
2 - Melt chocolate with butter in a heat proof bowl. Once it's melted add 1 1/4 cups of sugar, mix, then add one egg at a time and a tsp of vanilla and mix until well incorporated. Finally add the dry ingredients, but be careful not to overmix!
3 - For the cream cheese batter, whisk the cream cheese with 2 tablespoons of butter. Add 1/4 cup of sugar, egg yolk, tsp of vanilla and 2 tablespoons of flour.
Alternately spoon the chocolate mix and the cream cheese into a pan. With the tip of a knife swirl to marble.
4 - Bake for 50 - 60 minutes aproximately.

Et voilà! Enjoy!

Wednesday, 14 November 2012

Cuban Merengón - or how to enjoy a cheap & chic dessert!


This morning when I woke up and switched the television on all I could see in every channel, was news about the strike that is taking place in Spain.

Protesters all around the country rioting against the cuts the current government has been forced to made in order to solve the deep economic crisis we are suffering.

Prices keep on rising (electricity, gas, food, etc) what ends up on families having to cut expenses, specially on the grocery list.

This made me think: what does absolutely everyone have at home in their fridge or pantry and isn't expensive? Milk, eggs, sugar?
YES! And can a delicious (and easy) dessert be made from these 3 basic ingredients?
WELL OF COURSE!

So what is the name of this sweet and cheap dessert? MERENGÓN!

Merengón is a traditional Cuban dessert, very similar to the Portuguese Molotov. There is no difference between each other, just the name, so just like the egg and the chicken, you really don't know which came first!
The dessert is made out of egg whites beaten with sugar (in order to make a regular meringue), then caramel is added to the mixture and it is cooked in the oven in a water bath. With the remaining egg yolks a custard or creme anglaise is made to have with the cooked meringue. So nothing goes to waste!


The result is an absolutely delicious, light, airy and delectable dessert everyone will love!


Come on people, let's put a little touch of sweetness on these bitter and sad times we are living, and let's bake! Just like Frank Ocean's song, it is after all a "Sweet Life"


Find below the recipe!


Serves 8 people, you wil need:
For the meringue:
21  tablespoons of caster sugar ( 14 for the meringue and 7 to make the caramel)
6 egg whites

For the custard:
6 egg yolks
6 tablespoons of sugar
500 ml whole milk(or more depending on the consistency, if you want it less thick)

1 - Butter the pan (you can use a bundt pan, or if not a regular round one)
2 - Beat 6 egg whites with 14 tbsps of sugar. In a saucepan add the remaining sugar and cook it until you have a caramel sauce (do not add water!).
3 - Once you have the egg whites and sugar in the right consistency add the caramel and keep on beating until it us well incorporated. Bake in the oven in a water bath for 20 minutes.
4 - Put the milk in a saucepan, once it has started to boil remove from heat. Whisk egg yolks with sugar, and blend. Gradually whisk the hot milk into yolk mixture. Return custard to saucepan. Stir over low heat until custard thickens and leaves path on back of spoon when finger is drawn across, about 5 minutes (do not boil). Strain sauce into bowl. Cover and chill.
5 - Once the meringue is ready, unmold and serve it chilled with the custard.

Et voilâ! Enjoy!